Monday, 24 February 2020

Smashing Podcast Episode 10 With Trine Falbe And Martin Michael Frederiksen: What Is Ethical Design?

Smashing Podcast Episode 10 With Trine Falbe And Martin Michael Frederiksen: What Is Ethical Design?

Drew McLellan

A photo of Trine Falbe on the left, and Martin Michael Frederiksen on the right
In this episode of the Smashing Podcast, we’re talking about Ethical Design. What does it mean for a design to be ethical, and how do we make improvements in our own projects? I speak to Trine Falbe and Martin Michael Frederiksen to find out.

Show Notes

Weekly Update

Transcript

Drew McLellan: She is a human-centered UX strategist, designer and teacher who works at the intersection between people and business. She’s deeply passionate about ethical design and designing for children and she’s also a keynote speaker at conferences and a UX advisor in strategic projects. He is a serial entrepreneur born with a practical appreciation for the crossroads between business and digital development. He’s published the books cross channel and the CEO’s guide to IT Projects that cannot fail.

Drew: He works as an independent consultant for businesses that needed devil’s advocate when trying out new strategies and ideas. Together, they are two of the authors of the ethical design handbook, new from smashing this month. So we know their experts in the topic of ethical design, but did you know that also an amateur bobsled team? My smashing friends, please welcome Trine Falbe and Martin Michael Frederiksen. Hi Trine. Hi Martin. How are you?

Martin Michael Frederiksen: I’m smashing.

Trine Falbe: We’re smashing.

Drew: I wanted to talk to you today about the subject of ethical design, particularly in light of the new book you’ve written alongside Kim Anderson. So this isn’t the first book you’ve all written together, is it?

Trine: No, we actually have a project that’s three years old now. We published the book about white hat user experience. So that was our first book project together and that went so well that we decided to do another one.

Drew: So you’ve written about the topic of ethical design and this is a term that we’re hearing sort of more and more of lately is really rising up in the consciousness of designers, it seems to me at least. Why do you think that ethical design is becoming more relevant now?

Trine: We’re seeing a lot of tendencies in the world. We’re seeing a lot of lawsuits coming up. We’re seeing a lot of tendencies where people are starting to speak up against privacy issues and violations. So there are a lot of mega trends that are pointing towards a more ethical demand from the consumer side, so that’s just one of the things that we’re starting to see. It’s still pretty early on, still something that is slowly developing, but we definitely see some changes in the currents. So I think that that’s the reason why we’re starting to discuss ethical design at a much grander scale. There are also all sorts of issues related to lack of diversity, privacy in the sense of data being hacked and lacked. So we are starting to see an increase in general consumer awareness in this area, so obviously the industry needs to take that seriously and that’s what they’re slowly starting to do.

Martin: And it’s not without reason, I would say. There’s a famous photo of Mark Zuckerberg; it’s an official Facebook press photo and you can clearly see in that photo that he has put tape over the camera on his laptop. So he probably know that we are being under surveillance from social media and other platforms. He has definitely taken his precautions and the entire social media industry and the online advertising industry is listening on whatever we do, and the ethical design thinking is simply a pushback towards that.

Drew: Do you think that the rise in smartphones and the everyday use of digital products has an impact on this as well?

Martin: Of course it has. And I’m not thinking that marketing people or business people of today are more evil than 30 years ago. It’s just a different time, and the tools are different. But the scale of business, the number of days that you can aggregate using a digital technology is just huge and it just creates a new set of problems.

Drew: So getting back to basics, we talk about ethics. What do we really mean by ethics and how does that map to what we do in terms of design work?

Trine: So in the book we have a couple of definitions that are actually quite important. One is the definition of ethics, but the other one is the definition of ethical design because they’re not the same. So the definition of ethics we’ve brought down to something relating to duty and responsibility to treat others with fairness and respect. There are a couple of terms that are important, so responsibility and fairness and respect. And that’s something that we can tie over to design, to what we do in design because what we need to understand is that if we are to practice ethical design, we need to create products and services that grow from this principle, from ethics, the principle of fairness and fundamental respect.

Trine: But we also need to broaden that to understand that our business model and the way that we grow these products and services need to also be rooted in a fairness and respect towards, not just the people that are at the receiving end of our products, the customers, but also to the people that are involved with making these products. And that’s really what ethical design is about too; it’s about showing a fundamental fairness and respect towards everyone involved in a project or in a business running a product.

Drew: So sometimes it’s helpful to think of what the opposite of what ethical design is. Obviously there are lots of examples out there of unethical design and things that might perhaps emotionally manipulate users and customers. Have you seen lots of examples of that in your research?

Trine: Well, for sure, we’ve seen a lot more examples of unethical design than ethical design. That’s actually been a bit of a, not a pain but a struggle or at least a challenge when writing the book and researching for it. We’ve spent a year of doing this, is to find the good examples. It’s a lot… We’ve seen a lot more bad examples. Martin who brought up the Zuckerberg photo with the Mark Zuckerberg’s computer webcam being hidden or taped over is one. There are lots of examples, really big ones. Cambridge Analytica where with huge data breaches and, or data trade and potential manipulation of political results.

Trine: But we’re also seeing lots of products that just have all these really manipulative, dark patterns in their interfaces like booking.com, Viagogo, which is also they resell tickets to an increased price. So they have pretty much every manipulative pattern in the book that you can think of from trying to entice us to buy by saying all these other people are buying, we’re running out of stock, hurry up, hurry up. So all these different types of manipulative design patterns we’ve seen a whole bunch of.

Martin: But also, in a smaller scale, it’s also just sometimes it’s because there’s an evil business strategy, but most likely it’s just because no one really checked the customer journey. Like I was at a conference in New York, I booked a hotel and ever since they’ve been sending me emails. And, so the unsubscribe function on that email doesn’t work. You can send an email to the hotel, they don’t care or the one who received the email, it’s not her job or whatever. And a lot of what we see in dark patterns is just nobody cares or no one has the responsibility to do anything about it. And you shouldn’t confuse that because there’s the evil business model and then there’s the, we didn’t know how to do it right, and the latter is actually what we try to in the book is to explain how can you do this in a proper manner.

Martin: And of course you’re allowed to have a business model where you make a living out of your app or service or whatever you do. And one example is if you make a fitness app, you can have a paid version of the fitness app, you can have advertising, you can have a data brokering as the business model, but you could also just make it free. And then you could have a feature, limited free version that you can use to upsell one of the paid versions. And if I as a customer want to purchase that app, I may want to keep my data out of the cloud, so that could be an option in that fitness app that I pay a subscription fee and then all my fitness data is on my phone and only on my phone. And that would be one very simple example of having an ethical business model where you can actually make money from that fitness app, which is totally okay.

Drew: So it’s a lot more about putting the user first, which is something that we talk about in so many different areas of design, isn’t it? We talk about that in usability and in accessibility. And really that’s I guess the driving force behind good design, isn’t it? Is putting the user or the person who experiences that design first. I guess we see lots of examples of, I know when I’ve been, maybe purchasing tickets these sorts of things online and there’s sort of banners, nagging, say, 50 people are looking at this now, or sort of countdown timers that try and pressure you into making a quick decision without thinking things through. And those would be all examples of manipulating users, would you say?

Trine: Yeah, that’s a really classical tricks from the book; from manipulative design 101. And it’s, I mean, Martin and I just discussed this a lot because there is a business case for doing this, otherwise they wouldn’t be doing it. And we’re not really trying to convince the companies that deeply believe that this is okay, that this is fine, that let’s make our money like this. What we’re trying to do is empower the companies and teams and individuals who know that it might be a good idea to change directions to do something else because we know that there is a sound business in, and just it’s good business logic to do ethical design and it’s not like it’s something that just makes you feel better because that’s not… It’s a good argument, but it probably won’t convince the majority of CEOs that this will make you sleep better at night.

Trine: But you also have to understand that you don’t necessarily have to manipulate people into buying your product because that tends to backlash at you. You have to remember that treating people well means that they stay you’re loyal to your brand so you don’t get all this brand damage from manipulating people into buying a product that they don’t really need or want. You also have to be mindful of or respect the fact that a simple UI typically gives a better conversion rate. So when we declutter stuff, when we declutter an interface, it typically results in a better conversion because it’s simpler to perform an action. There’s not all the cognitive load that comes with a hugely cluttered interface like we see in a lot of poorly designed websites.

Trine: And then there’s obviously all the legislation that is appearing; not just in Europe but most recently in California as well. And this is also a tendency that we’re seeing. So that’s also something to look out for. And then, focusing your budget on creating good products and good customer service instead of always trying to handle backlash on social media is also a pretty compelling argument that you might want to look into. So it is a good business logic to do ethical design, it isn’t the opposite.

Drew: Would you say it comes down to short term versus longterm thinking? Because presumably these, the manipulations, the dark patterns, those sorts of things produce; they do produce business results in the short term. You can put something in place and see your conversion rate go up, but then perhaps over the long term, that damage to your brand starts having an effect.

Martin: I think that’s perfectly true. I think you have to look at the business that you do online as if you had a store on the main street in a medium sized city where you have to keep your reputation intact, and if you don’t treat your customers well, then longtime… If you don’t treat your customers well, longterm you run out of business because people, they would go to some other store or they will buy from online. So whatever you do online, you really have to think of that there’s a longterm effect. And also there’s a kind of a there’s a hidden cost in doing things that are complex or things that manipulate, and if you declutter, as Trine says, there will be a longterm saving. And that’s never calculated when you talk about business model. You always talk about how much money you can make.

Martin: You never talk about the cost of making that amount of money. And especially in business to business project, you see lots of, and I’m not the type of guy, I’m involved in these projects, so I’ve firsthand experience from this. You see salespeople, they have a very complex pricing structure, and that’s because 20 years ago, 30 years ago, they would meet with all the customers and they will make individual pricing for the customers because that was how you did business before digital. Now they implement that and you’ll see that every customer will have his own price or her own price for any item, and you will synchronize millions of products every night. And if you create a more segmented business strategy, simpler pricing, it’s easier for customers to compare your pricing against the competitors. And if customers today are aware or they assure that they are not being… That they’re not paying too much for their products, they… That the pricing is not an issue, and the great customer service is the advantage.

Drew: We mentioned briefly legislation a sure while ago. In Europe, we think of GDPR a lot lately. How does something like GDPR as a piece of legislation play into ethical design?

Trine: Well, it plays into ethical design in the sense that we’ve added an additional layer of reasons why ethical design is that is an increasingly good idea because now we are not just facing… Our companies are not just facing potential backlash, and as Martin mentioned, additional costs that are related to doing manipulative design in your interfaces, and in the way that you conduct your business. You also face huge fines that come with GDPR and the California recently a privacy law in California. So that’s one thing. I think another thing is also that there is a pretty expensive cost related to compliance; legislative compliance that’s would be reduced if you have proper data models, proper data structure instead of just collecting everything you can get your hands on, but if you just go ahead and connect the data that you actually need to run your business, you have a much greater success rate in being complied to the legislation because you know what you have and you only have exactly what you need and when you’re deleting the data and how you’re deleting it and how you’re storing it instead of just putting everything in a pile in your database because you can.

Martin: I don’t think there’ll be huge fines for the GDPR except for a few big companies that will be toasted in public to show that the EU is focusing on this. Well, I think there will be lawsuits that will follow data breaches. So instead of fearing the GDPR, police will come after you at any time if there’s a data leak or a problem in your team, then you may have a problem. But the much bigger problem is that a lot of consumers will actually follow your brand and they will monitor if you do anything wrong. And the damage you can get from cheating on your customers is much higher than whatever you have to pay to the EU. And one is simple example is that a lot of consumers just like myself, will sometimes use a unique email address to sign up for a product or service.

Martin: And if you later on get an advertisement or some kind of contact based on that unique email address, you know that the source, so even the GDPR police from the EU is not at your office to check what you are doing, consumers will be checking on you all the time. And that’s, I think that’s, I think it’s wonderful. I think that GDPR is wonderful for European businesses because as a consumer, I now have a weapon against the business. I can contact them and I can say, I want the data that you have stored on me. I want to see the files. What do you have? And I think that’s good protection for your identity.

Trine: Totally agree. And I also think that GDPR has really impart, even if the common consumer doesn’t know how to utilize GDPR directly, the fact that GDPR has been so widely discussed and has had so much media attention. Ever since it’s, before it came into effect, and even today, in the general media, what that does to the general consumer is that it empowers them to talk about and consider and worry about and become critical towards their own privacy. This is something that we haven’t seen before; the pretty common perception from people who didn’t work in digital was I have nothing to hide, so I don’t really care, and I know the products are free and I know that I’m kind of paying with something, but they really have had very little idea as to what that currency was.

Trine: Today, they have a much greater knowledge on what data privacy and digital privacy is because GDPR has been so widely discussed in Europe. So I think that’s something that really has had a significant, has made a significant change in consumer awareness.

Martin: In Europe.

Trine: In Europe.

Martin: Because if you are an American, you are used to that you have no protection, whatsoever.

Trine: Exactly, if you live in California, right. And that’s just the first state. I’m pretty sure that that will be an example; leading example.

Martin: I think the funny part of this is actually that when you make a new law like the GDPR as an international company, all your software platforms will comply to that regulation because it’s too expensive to run two different software setups, one in Europe and one in the rest of the world. So a lot of countries outside of Europe, they are actually benefiting from GDPR because it will be the same software platform and the company don’t want to be out of business in Europe.

Drew: So I guess a lot of ethical design is not just how we design our interfaces, but maybe how we design our systems to handle our customer’s data as well, and looking at the whole experience from the beginning to the end of doing the right thing for the customer.

Martin: Yeah. And data storage is extremely important because you have to prove that you you keep my data in a safe place. And let’s say that I delete my app, I delete my account. Can you then verify that you actually deleted my data from all the backups? That’s extremely complicated. So you have to put that into place and you also have to test for it. There’s something wrong in the perception that I get a job in a software team and then I can kind of change everything and make everything ethical because a single person cannot do anything in this area. It needs to be a team effort.

Martin: And even you have the best intentions of what you do, it also matters that you can actually test and verify that it’s done right. And you will see in a software team that if you’re a developer and you write code, you will have to make a lot of decisions on your own because you have a business team behind you. They set up all the requirements. They have never time to meet with you. They will never answer your questions and they don’t understand your language. So as a programmer, you need to make a lot of decisions on your own. And for that reason, the importance of the test team is just, it’s so vital that they do that job, and testing if data are stored in the right place using the right methods. It’s just complicated.

Drew: So if I am a programmer or a designer within an organization, and in my view, the organization isn’t taking the most ethical approach, is there anything I can do to help to correct that, to help start changing course? Is there something that a designer can do or is it a case of get a new job?

Martin: Well, I think sometimes it’s a matter of getting a new job, but when I’m involved in a project, I always try to change things for the better. And one good way of doing so is to write up a small IT governance model for the project that you do because usually we can all agree in the principles. So after we’ve done that, we also have to follow the guidelines that we’ve been setting up. So let’s say that one of the guidelines is privacy first; the private, the privacy settings should by default be as private as possible for any user. Then if that’s your governance principle, then no matter what you do, you have to check, do we follow that principle and small steps, that’s also great. You don’t have to change everything from day one and you can’t do that, but you can make a small change every week. And then in a year or two, it makes a big difference.

Drew: So do you think it’s best just a work guerrilla style and put some sort of ethical influence on the parts of their product that you actually touch? Is there any mileage to be gained in trying to make a business case or trying to persuade the people at the top of the organization that this is a change they should make? What do you think? It’s just small changes from below to try and help where you can.

Martin: It all depends on your job title and your responsibility because if you’re a programmer, you can do a lot of invisible stuff that’s done right and no one will ever find out how good you are, but you can still do it. And if you work in a business unit, if you work in communication or in sales, you may be worried about the brand value, the reputation, the longterm effects. So it can also be meeting with some of the others in other roles and see how you can influence them.

Trine: Sometimes it’s also a matter of, if you are in that, again, I agree with Martin. It depends on your job title; how much reach you basically have. But a good way of sparking change or starting this ethical transformation that we call it is to pick a project that is kind of isolated where you can also… So a project that you have responsibility of that you can make your own and make that the changes that you, the ethical changes that you find important because what happens is you also have a piece of a project that you can now measure on. So that is the first step to proving the business case is to be able to measure that it actually had a positive impact. So that’s a very specific way to get started on this.

Drew: So if I’m starting out a new project or starting at a new organization or even maybe working on a side project that I would like to become something bigger, is there a good approach that I can take? Are there any frameworks that I could work within to help me make good ethical design choices?

Trine: Yes, there are plenty of frameworks. One is to be mindful of the consequences that you have. So there are some questions that you could ask for any decision that you’re making to make sure that it complies with certain ethical principles. One is, what are the longterm and short term consequences of the decision you’re about to make? Is it something that has any negative impact, either long or short term to the people that you’re designing your product for or to the team that’s dealing with, because consequences doesn’t just have to do with and users. It also has to deal with the business. If you’re making a decision that potentially hurts the brand of the company, then that’s a pretty serious consequence as well.

Trine: I think a good asset test if you’re doing a product or doing a feature is to ask yourself whether you would want one of your loved ones to be using this feature because if the answer is a clear no, then that’s an indicator that what you’re making might not be super clear cut; might need to be revisited to understand why it is that you’d want the business customers to use this, but you wouldn’t want your sister or mother or spouse to be using the same feature. And then you have to ask yourself, why is that?

Martin: I would like to quote from the book because we have a case story with LINGsCARS and it’s a car leasing and Ling Valentine, she’s just so different from the rest of her business. And she describes, and this is a quote from the book, “I would describe my ethic ethics as honesty wrapped in a boxing glove.” And if you just set up a very straightforward principle for whatever you do, it’s easy to follow.

Trine: Very true. Ling is exceptional. As you said Martin, she is in an industry that is notoriously known for not doing anything ethical or not doing a lot of things with an ethical mindset, but she will… I actually read through her entire privacy policy, which is normally a really, really dull thing to do, but I had the time of my life while doing so. She has something like… Yeah, I made Marsden read it. Yeah, I know.

Martin: That’s funny.

Trine: She had something like, I wish I could sell all this. I know I could make a ton of money selling the data of my customers, which is a compelling thought, but I won’t, I will… And she says something like, I will put it in a can of worms and dig it to the ground and sit on it before I do. So she knows that she’s sitting on a pot of gold and she also knows that she would never, ever sell it and that she’s very straight forward in that. And she has to, I mean, I encourage you. I normally never encourage anyone to go through the agony of reading a privacy statement because they’re usually so boring, but LINGsCARS is the exception. It’s a great Sunday read, go for it.

Drew: The book has lots of case studies throughout it. Are there any that stand out in your mind that would be interesting to highlight?

Martin: I think it’s actually more important that the book is also trying to provide a method for what to do. And it’s based on the case stories. It’s based on all the personal experiences we’ve had over the past 25 years in the software business. And I think when you read the case stories, they are unique in different ways and they all add to that general picture of what to do in the future. And then at the end of the book, we have four different blueprints for how to do a website, eCommerce solution, program an app, create technology for internet of things. And that’s actually how you get started. So after reading the case stories and the other content in the book, what is really important is that you create a change.

Martin: And we’ve been talking for many years about digital transformation, but the next level is actually the ethical transformation where you take all the ethical principles for good software design and you build that into the process and you have to understand that ethical design is not like you have a birthday cake and it’s made out of aero planes and pineapple and then you have a nice frosting on top of that cake; it will not be a good treat anyways. But it’s something that ethical design is actually a part of the entire design process, and that’s what we try to accomplish with the blueprints at the end of the book.

Trine: Yeah, I think, I honestly believe that that’s what will make this book something that will empower people to create that change and to start, because of course we raised the different concerns that are pretty commonly known, but we also know and we… Well, yeah, we also know that the readers of this book already know about the problems, right. It’s all over the place. What we’re trying to do is to give people some tools to get started on doing change and doing stuff differently. And the blueprints is one approach. We also included an ethical scorecard in the book, which basically is a way you can utilize it in different ways. You can utilize it to get an overall picture of whether of the ethical, where on the ethical scale your company is; where your product is.

Trine: But you can also actually use it to, you can take out different statements and different areas of the scorecard, and use it as your KPI to measure on ethical design. And that’s something that is still not being talked a lot about. How do we actually measure on these types of things, but it’s totally possible to do so and that’s something that we’ve spent significant time on addressing as well because we know that we need to, the people need to be able to make the business case. They can’t just go to their CEO and say, this will make you sleep better at night.

Martin: I have an example of a customer journey that will score really bad on ethical design. And this is a real example. It’s Serge Egelman on Twitter. He writes, “In order to verify my identity over the phone, Macy’s wanted to send me a one time password via SMS. They then asked me to give them a number to send that one time password too.” And this is just a completely broken customer journey and nobody has, no one has tested it. And these examples, they are all over the internet. When you start looking for them, you’ll find lots of broken customer journeys. And that’s why the evaluation method, using that ethical scorecard is so important because it takes like half an hour to go through the scorecard and then you will know where to improve.

Drew: That was something that really pleasantly surprised me with the book because I think I was expecting the book to be, to explain the case for ethical design; to motivate me to make changes. What I was then pleasantly surprised with was the things like the scorecard to help me actually evaluate a design. And then the very practical blueprints as you say in their sort of last third of the book that actually describe how I would practically go about creating more ethical designs. So that was, I thought that was very refreshing and a really nice approach to a book of this nature.

Martin: Thank you. We also discussed being angry if that would be a good idea. You can always write a book about ethical design and then blame everyone for doing it wrong or we thought that wouldn’t be as helpful.

Trine: Yeah, I think we decided very early on that we will leave it to others to be angry, and then we’ll focus on being optimistic. The whole book has been written with an optimistic mindset, meaning that if you’re not optimistic that you can actually do this, then it’s really hard to convince others to join you. So we’re aiming for optimistic.

Drew: That’s great.

Trine: Martin has touched upon it the fact that you can’t really, it’s very hard to make ethical transformation on your own and sometimes the answer to, do I try to, do I fight for it in this company or do I find another job, but sometimes the answer is finding another job. It’s actually interesting that the… And this also speaks towards what why it’s might be a good idea to actually start doing this. I recently read, there is an estimated 66% of millennials who actually want to start their own business because they’re so fed up with these big corporations where they can’t have any impact.

Trine: So if you’re opening up your processes and your work structures to people actually getting to have a say and actually allow them to make changes because millennials also a lot more value driven than the older generations. Then you may have a better chance at retaining talent, which is actually also one of the cases that we have in the book. We tried to really cover very broadly into in the sense that we know that ethical design is not just about product development. It’s not just about the website or the app. It’s not just about the business model. It’s not just about data handling or teams or work processes. It really is about it all, and we’ve really tried to include all of that so that it becomes apparent that this is not just about products.

Martin: If we go back to the guerrilla model and talk about you make small changes, you do that on your own and later on you will have to prove to your team and to your boss that you are actually doing something good. First of all, the ethical scorecard is a really easy method of establishing a baseline and then whatever you improve later on you can actually show that the things they are changing for the better. And that business case that you have to create is, in my experience, always that you end up doing things in a better way and it will not cost you more money, which is one of the best business cases that you can ever present to your organization. So sometimes it’s a good idea to work in the hidden for like two or three months, probably in a small team, create the changes, implement them, show the better results, and then go to your boss and say it would be a good idea to establish this as the way we work in the future because it’s actually, it’s not costing us any money, but it’s just giving us better results.

Martin: And the wonderful thing about online is that as a consumer, the competition is always just one click away. So as a consumer, you can move in any direction at any time if you want to. And business managers, they should be aware that they are in a market where there’s no loyalty in the market if you don’t behave well or if you are too expensive, the loyalty is gone in a second. So as a business, you really have to be serious about this.

Drew: The ethical design handbook is full of loads of really good examples, case studies, and practical information to get started. And it’s available now from smashing at smashingmagazine.com/books. So I’ve been learning all about ethical design. What have you been learning about lately?

Trine: So I’ve actually been researching a lot on the financial impacts on diversity or lack of diversity, however you want to… Well, most of the case studies are still due to lack of diversity, but that’s something that I’ve become increasing interested in; to understand how diversity can actually make for better businesses and better products. I’m also diving into some new and alternative approaches to design thinking and some activities and things that you can do there. So that’s what I’ve been up to since the writing work of the ethical design handbook stopped.

Martin: And for me currently, I’ve worked with the ethical design in the internet of things, which is actually quite interesting because if you monitor what’s going on in a factory and you collect a lot of data, you can do lots of mistakes. But you can also do a lot of things right if you have the right strategy. And then I’m trying to improve how I can throw a Frisbee longer with my sidearm shot.

Drew: I love it. If you, dear listener, would like to hear more from Trine or Martin, you can find Trina on the web at trinefalbe.com and Martin at MartinMichael.IO. Thank you for joining us today both. Do you have any parting words?

Trine: Buy the book.

Martin: I agree with her.

Smashing Editorial
(dm, ra, il)

from Tumblr https://ift.tt/32lYj5U

Setting Up Tailwind CSS In A React Project

Setting Up Tailwind CSS In A React Project

Blessing Krofegha

In the dispensation of CSS libraries and frameworks, a ton of awesome libraries have been built to simplify the work of a developer in the quest to create intuitive interfaces. However, quite a lot of them (Bootstrap, Foundation) impose design decisions that are difficult to undo; they come with predefined components, therefore, eliminating the need for dynamic customization. This is the reason why Tailwind CSS is considered to be a good choice for building 21st-century web interfaces.

With Tailwind CSS, you get to create the components that suit what you want or what you are working on. These components can be created by harnessing the power of the utility-first prowess of Tailwind CSS. If you are tired of making use of Bootstrap and its likes, you’ll find Tailwind CSS a good fit for working on beautiful interfaces as you implement the designs you need using the utility classes it provides.

In this tutorial, you will learn what Tailwind CSS is and how to work with it. In the end, you’ll have built a profile card that uses Tailwind CSS utility classes. After that, you can go on to build a portfolio website that showcases your skills and other things you have worked on.

Note: While we won’t be writing CSS in this tutorial, a good knowledge of CSS will come in handy as you work through what we will be covering.

Styling In Modern Web Apps

There are different ways of organizing styling in modern applications which often have complex interfaces and design patterns. Let’s walk through BEM, preprocessors, CSS-in-JS and even design systems to find out what works best for you. Learn more →

What Is Tailwind CSS?

Tailwind CSS is a utility-based low-level CSS framework intended to ease building web applications with speed and less focus to writing custom CSS, without leaving the comfort zone of your HTML code, yet achieve awesome interfaces.

For example, you could style a button with just a few classes (instead of always having to declare a single big class separately from your HTML and writing a bunch of properties to make something):

<button class="bg-blue-500 hover:bg-blue-700 text-white font-bold py-2 px-4 rounded ml-4 mt-4">
  Button
</button>

Other CSS frameworks (such as Bootstrap, Foundation, Bulma, and so on) present you with diverse predefined components (such as modals, buttons, alerts, cards). But with Tailwind CSS, you get to make your own, or you’re forced to make your own depending on your project model. Another way to put it, you actually own the components, and you get to harness your customization power on any component of your choice. This means that there is no more need to fight against the framework, and trying to figure out which classes need to be overridden in order to get results you initially aimed for.

Why Use Tailwind CSS?

Maybe you’re not quite ready to betray other frameworks yet, or you haven’t been convinced to embrace the goodies that come with Tailwind CSS. Allow me to give you a few reasons why you may want to consider Tailwind CSS.

No Naming Conventions

One of the most stressful parts of writing custom CSS is having to name classes. At every point, you’re pondering which class should be generic or specific. How do you organize them and ensure they’re cascaded? Tailwind CSS solves those problems seamlessly by providing utility-based classes that can be used all the time.

However, cases may arise where you need to name some classes. Sometimes this tends to happen when you need to extract certain components and use them later in your design (with the help of the @apply directives).

Cache Benefits

When writing custom CSS (or using any other traditional CSS framework), you always have to make changes to your CSS files when making changes in your designs. With Tailwind CSS, you need not worry a bit about that since you’re using the same classes over and over again within the markup. This means that you do not have to bust your CSS cache everytime in order to make small changes to your design.

When Not To Use Tailwind CSS

Are you saying I should always use Tailwind CSS for every project? Of course not! There are a few use cases where you may not want to use Tailwind CSS.

If You’re Working On A Small Projects

When you need to get started with a mini-project that has a very short deadline (especially something a few users would be using or only yourself), then Tailwind CSS is not the best option. In those cases, I’d recommend using Bootstrap, Foundation or any other framework instead. That’s because they come with predefined ready-to-use components (themes to get started with). With Tailwind CSS, you have to creatively create your own.

If You’re A CSS Beginner

Before diving into Tailwind CSS for any project, its advisable to know CSS. Beginners that desire to use Tailwind CSS for web-based projects should first master CSS to a certain degree. It provides utility classes that are linked to the underlying CSS, therefore, only those with a solid knowledge of CSS can easily build with it.

If You Dislike Adding A Lot Of Classes To Your Elements

When writing Tailwind CSS, you always have to write lots of classes, which makes your codebase (HTML) look busy and sometimes difficult to read. If you prefer keeping your code neat, you may want to consider writing custom CSS or use any other CSS framework (such as Bootstrap).

With these reasons, it’s about time to move over to the business of the day: let’s set up Tailwind CSS in a React project together!

Getting Started

To set up our project, we’ll scaffold a new React app using create-react-app. If you have already done this, skip this process, otherwise, run the command below:

npx create-react-app react-tailwindcss && cd react-tailwindcss

Next, we install a few development dependencies. You can use any of the options that work for you.

Using npm

npm install tailwindcss postcss-cli autoprefixer -D

Using Yarn

yarn add tailwindcss postcss-cli autoprefixer -D

We need to initialize Tailwind CSS by creating the default configurations. Type the command below in your terminal:

npx tailwind init tailwind.js --full

This command creates a tailwind.js in your project’s base directory; the file contains the configuration, such as our colors, themes, media queries, and so on. It’s a useful file that helps with predefined sets of properties which will aid the need to re-brand certain conventions or properties if the need arises.

How To Configure PostCSS?

The PostCSS documentation states that:

“PostCSS is a tool for transforming styles with JS plugins. These plugins can lint your CSS, support variables and mixins, transpile future CSS syntax, inline images, and more.”

Why Autoprefixer?

It’s necessary to install Autoprefixer alongside Tailwind CSS because Autoprefixer usually tracks caniuse.com to see which CSS properties need to be prefixed. Hence, Tailwind CSS does not provide any vendor prefixing. If you’re curious as a cat in regards to PostCSS navigate to their documentation.

Create a PostCSS configuration file in your base directory manually or using the command:

touch postcss.config.js

Add the following lines of code to your PostCSS file:

const tailwindcss = require('tailwindcss');
module.exports = {
    plugins: [
        tailwindcss('./tailwind.js'),
        require('autoprefixer')
    ],
};

Because PostCSS is necessary to lint our CSS, hence this configuration.

Code Steps

  • We fetched the Tailwind CSS package and placed it in a variable.
  • We wrapped tailwind.js (our default base configuration) in our tailwindcss variable.
  • We fetched the autoprefixer package.

How To Inject Tailwind’s Components, Utilities And Base Styles To Your App

Inside your src folder create a folder, name it assets, this is where all your styles would be stored. In that folder, create a tailwind.css file and main.css file respectively. The tailwind.css file will be used by us to import Tailwind CSS styles, and for custom configurations and rules. The main.css will hold the styles that are generated as a result of what we have in the tailwind.css file.

Next, we need to import the base styles and configurations. We will do that in one of the CSS files we created above. Add the following to your tailwind.css file.

@tailwind base;

@tailwind components;

@tailwind utilities;

Note that we used the @tailwind directive to inject Tailwind’s base, components, and utilities styles into our CSS:

  • @tailwind base
    This injects Tailwind’s base styles, which is a combination of Normalize.css and some additional base styles.

    Note: If you’d like to get the complete references of all the styles applied by Preflight, see this stylesheet.
  • @tailwind components
    This injects any component (reusable styles like cards and form elements, etc.) classes registered by plugins based in our config file.
  • @tailwind utilities
    This injects all of Tailwind’s utility classes(including the default and your own utilities) they are generated based on our config file.

Tailwind CSS will swap these directives out at build time with all of its generated CSS. If you’re using postcss-import, use this instead:

@import "tailwindcss/base";

@import "tailwindcss/components";

@import "tailwindcss/utilities";

How To Configure Your App To Build Your CSS

Next, we need to configure our project to build our CSS styles each time we run either the npm start or yarn start command.

Open your package.json file and use the snippet below in place of the script part of your package.json file:

"scripts": {
    "start": "npm run watch:css && react-scripts start",
    "build": "npm run build:css && react-scripts build",
    "test": "react-scripts test",
    "eject": "react-scripts eject",
    "build:css": "postcss src/assets/tailwind.css -o src/assets/main.css", 
    "watch:css": "postcss src/assets/tailwind.css -o src/assets/main.css"
  },

Importing Our CSS

We need to import our CSS file appropriately to ensure that it’s properly watched and built when we run yarn start or npm start.

Open your index.js file and make the following changes:

  1. Import our main.css file and delete import './index.css';.
    import './assets/main.css'
    
    Your *index.js* should look like this after the changes:
    import React from "react";
    import ReactDOM from "react-dom";
    import './assets/main.css';
    import App from "./App";
    ReactDOM.render(<App />, document.getElementById("root"));
    
  2. Head over to App.js and delete import logo from './logo.svg'; leaving only import React from 'react';. Also delete everything inside the App component. (Don’t worry if our App.js looks barren now — we’ll add some code as we proceed in this post.)

Let’s Build A Profile Card Project

Now that our setup works well, and everything looks good, let’s build a Profile Card. However, I’d like to show you what the state of our app before we begin.

React app
React app (Large preview)

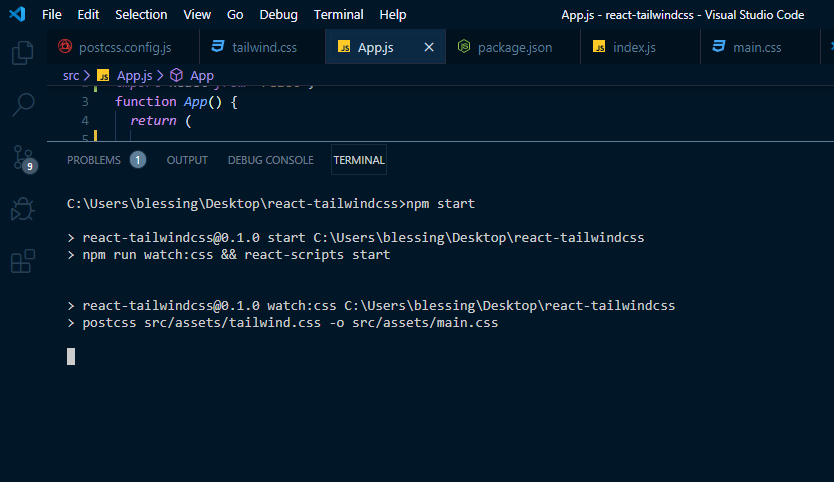
To start your app, type this command npm start or yarn start.

Command Prompt - Starting our app
Command Prompt - Starting our app (Large preview)

You’d observe that our Tailwind CSS is building the necessary files needed in main.css.

Let’s get started in our project. Here’s what our code (App.js) looks like without implementing Tailwind CSS classes.

import React from 'react';
function App() {
  return (
      
    <div className="">
      <img className="" src={require('./profile.jpg')} alt="Display" />
      <div className="">
        <div className="">
          Blessing Krofegha
        </div>
        <p className="">
          When i’m not coding i switch to netflix with biscuits and cold tea as my companion. <span></span>😜
        </p>
      </div>
      <div className="">
        <span className="">#Software Engineer</span>
        <span className="">#Writter</span>
        <span className="">#Public Speaker</span>
      </div>
    </div>
  );
}
export default App;

The outcome of the above code snippet is thus the following:

Our Project without Tailwind CSS
Our Project without Tailwind CSS (Large preview)

As you can see, all of the text has been aligned to the left by default. The image is pretty big because there is no styling. The App component has four main divs to which we’ll be adding classes to. This will then, of course, change the styling of the elements.

First div

import React from 'react';
function App() {
  return (
      
    <div className="max-w-sm rounded overflow-hidden shadow-lg">
      <img className="w-full" src={require('./profile.jpg')} alt="Display" />
      <div className="">
        <div className="">
          Blessing Krofegha
        </div>
        <p className="">
          When I’m not coding, I switch to Netflix with biscuits and cold tea as my companion. <span></span>😜
        </p>
      </div>
      <div className="">
        <span className="">#Software Engineer</span>
        <span className="">#Writter</span>
        <span className="">#Public Speaker</span>
      </div>
    </div>
  );
}
export default App;

Code Steps

We gave the div max-width with max-w-sm for small screens and have added border-radius using the rounded class. To prevent scrolling bars from showing up, we used overflow-hidden.

On the first div, we garnished our background with a shadow effect using box-shadow with the shadow-lg class. Using this means that we’d be having a box-shadow(shadow effect) of 0px from the top, 10px from the right, 15px from the bottom, and -3px from the left (with a faint black on the left axis).

On the right axis, we’ve got 0px from the top, 4px from right, 6px from the bottom and -2px from the bottom (with a lighter shade of black rgba(0,0,0, 0.05)).

Do you mean a simple class name such as max-w-sm rounded overflow-hidden shadow-lg is responsible for all of this awesomeness? Yes! That’s the awesomeness of Tailwind CSS!

Next, we gave img a width of 100% with w-full and an src attribute and, of course, an alt attribute.

Here’s how our new Profile card should look like:

The outcome of our first div
The outcome of our first div (Large preview)

Second div

Add this class px-6 py-4 to our second div:

import React from 'react';
function App() {
  return (
      
    <div className="max-w-sm rounded overflow-hidden shadow-lg">
      <img className="w-full" src={require('./profile.jpg')} alt="Display" />
      <div className="px-6 py-4">
        <div className="">
          Blessing Krofegha
        </div>
        <p className="">
          When i’m not coding i switch to netflix with biscuits and cold tea as my companion. <span></span>😜
        </p>
      </div>
      <div className="">
        <span className="">#Software Engineer</span>
        <span className="">#Writter</span>
        <span className="">#Public Speaker</span>
      </div>
    </div>
  );
}
export default App;

Code Steps

In our second div, we gave it a padding-right/left of 1rem representing px-6 in the x-axis and padding-top/bottom of 1.5rem which is py-4 in the y-axis.

The outcome of our second div
The outcome of our second div (Large preview)

Third div

Add the class font-bold text-purple-500 text-xl mb-2 to our second div:

import React from 'react';
function App() {
  return (
      
    <div className="max-w-sm rounded overflow-hidden shadow-lg">
      <img className="w-full" src={require('./profile.jpg')} alt="Display" />
      <div className="px-6 py-4">
        <div className="font-bold text-purple-500 text-xl mb-2">
          Blessing Krofegha
        </div>
        <p className="text-gray-700 text-base">
          When i’m not coding i switch to netflix with biscuits and cold tea as my companion. <span></span>😜
        </p>
      </div>
      <div className="">
        <span className="">#Software Engineer</span>
        <span className="">#Writter</span>
        <span className="">#Public Speaker</span>
      </div>
    </div>
  );
}
export default App;

Code Steps

We set the font-weight to a value of 700 with font-bold class. Next, we gave our div a light purple color using text-purple-500 and made our font-size extra small by using text-xl. We gave our div a margin-bottom of 0.5rem by using mb-2. We also added a paragraph and made its color a darker shade of gray using text-gray-700.

We added a light text color to our paragraph with text-gray-700 and a font size of 1em using text-base. Therefore, text-base is equal font-size: 1rem and text-gray-700 is equal color: #4a5568;

Let’s see what changes were made with our 3rd div:

The outcome from our third div
The outcome from our third div (Large preview)

Fourth div

import React from 'react';
function App() {
  return (
      
    <div className="max-w-sm rounded overflow-hidden shadow-lg">
      <img className="w-full" src={require('./profile.jpg')} alt="Display" />
      <div className="px-6 py-4">
        <div className="font-bold text-purple-500 text-xl mb-2">
          Blessing Krofegha
        </div>
        <p className="text-gray-700 text-base">
          When i’m not coding i switch to netflix with biscuits and cold tea as my companion. <span></span>😜
        </p>
      </div>
      <div className="px-6 py-4">
        <span className="inline-block bg-gray-200 rounded-full px-3 py-1 text-sm font-semibold text-gray-700 mr-2">#Software Engineer</span>
        <span className="inline-block bg-gray-200 rounded-full px-3 py-1 text-sm font-semibold text-gray-700 mr-2">#Writter</span>
        <span className="inline-block bg-gray-200 rounded-full px-3 py-1 text-sm font-semibold text-gray-700 mt-2 ml-20">#Public Speaker</span>
      </div>
    </div>
  );
}
export default App;

Code Steps

Like the previous div mentioned above, we added a padding-right/left of 1rem representing px-6 in the x-axis and padding-top/bottom of 1.5rem respectively representing py-4 in the y-axis.

Lastly, we added a few classes to our spans which include inline-block. What this does is sets the display of the span which means the element is treated like other inline elements but allows the use of block properties.

We added a background-color of gray using bg-gray-200 and created a border-radius of 9999px using the rounded-full class; px3 adds padding to the x-axis while py-1 adds padding in the y-axis. text-sm is added to make the font-size of the text small and text-gray-700 was used to add a dark shade of gray color to the text. We went on to add margin-right to the span element.

If you’ve been carefully following along, then you should have something similar:

Final outcome of our Profile Card
The final outcome of our Profile Card (Large preview)

Note: You can replace the image with an image of your choice (preferably yours) and also personalize the content any way you wish.

Conclusion

I hope you enjoyed this tutorial. Of course, you can take always take it a bit further by making this a little profile application that says much more about you beyond the little information we have above. For example, you could go on to share a list of skillsets that you have, or add a table to projects you have worked on and possibly a contact form. Let your creativity flow, and please do share your projects in the comments section below — I’d love to see what you come up with!

Smashing Editorial
(ks, il)

from Tumblr https://ift.tt/2Plagn1

Friday, 21 February 2020

How To Build A Simple Cryptocurrency Blockchain In Node.js

How To Build A Simple Cryptocurrency Blockchain In Node.js

Alfrick Opidi

The unprecedented rise of cryptocurrencies, and their underpinning blockchain technology, have taken the world by storm — from the humble beginnings of being an academic concept over a decade ago to current increased adoption in various industries.

The blockchain technology is receiving a lot of attention because of its ability to enhance security in trustless environments, enforce decentralization, and make processes efficient.

Traditionally, Python has been the de facto programming language for blockchain development. However, with the proliferation of this amazing technology, the development options have also increased — and Node.js has not been left behind.

In this tutorial, I’m going to talk about how to build a simple cryptocurrency blockchain in Node.js. It’s not going to be too fancy, but just sufficient to assist you to understand how a blockchain works.

I’ll call this simple cryptocurrency smashingCoin.

If you are a JavaScript developer who wants to take a leap into the burgeoning field of cryptocurrency, this article will equip you with the necessary skills to get started. Or, if you’re curious about how things work in the world of cryptocurrencies, then this tutorial may help in answering some of your questions.

Recommended reading: Understanding Subresource Integrity by Drew McLellan

Prerequisites

To follow this tutorial successfully, you’ll need to have the following:

  • Node.js installed on your machine. You can download it from here;
  • A code editor, such as Visual Studio Code, Sublime Text, or any other.

Let’s get started…

What Is A Blockchain?

Blockchain is the technology that powers digital currencies, such as Bitcoin and Ethereum. It is an innovative distributed public ledger technology that maintains a continuously growing list of records, referred to as blocks, which are connected securely using cryptography.

The term blockchain has earned its name because of the manner it keeps transaction data, i.e. in blocks that are connected to each other to create a chain. The size of the blockchain grows with an increase in the number of transactions undertaken.

Any valid transaction data is logged into the blockchain network, which is governed by peer-to-peer rules that the participants stipulate. For example, this data could contain the “value” of the block such as in digital currencies, a record of transactions (such as when parties exchange goods and services), or entitlement privileges such as when the chain records ownership information.

Besides the transaction data, every block may contain its own cryptographic hash (a unique identifier or digital footprint), its own nonce value (an arbitrary random number used once in cryptographic computations), the hash of the previous block, and a timestamp of recent authenticated transactions.

Since every new block should point to the previous block, if a block is incorporated into the chain without containing the right hash of the last block, it could render the entire blockchain invalid. This immutability property is key to the security of blockchains.

Furthermore, various types of consensus protocols are often applied to maintain the authenticity of the blockchain. Consensus ensures that all participants agree to the network-validated transactions.

For example, a commonly used consensus protocol is proof of work, which aims to identify a number that finds a solution to a complicated mathematical problem after completing a certain amount of computing work.

The main idea of proof work is that any participant in the blockchain network should find this number difficult to identify but easily verifiable. Consequently, it discourages spamming and tampering with the structure of the blockchain.

In the case of most cryptocurrencies, adding a new block to the blockchain requires solving a complex mathematical equation, which increases in difficulty over time as the blockchain grows. Consequently, any person who proves that they’ve done work by solving this problem is compensated with a digital currency, in a process referred to as “mining”.

How To Create A Block

Now, after introducing the blockchain technology and how it works, let’s see how we can apply the concepts in creating a block. As earlier mentioned, blocks are what interlink to each other to form a blockchain.

To create the smashingCoin currency, I’ll use JavaScript classes, which were introduced in ES6.

Ready?

Let’s get our hands dirty…

Here is the code for the CryptoBlock class:

const SHA256 = require('crypto-js/sha256');
class CryptoBlock{
    constructor(index, timestamp, data, precedingHash=" "){
     this.index = index;
     this.timestamp = timestamp;
     this.data = data;
     this.precedingHash = precedingHash;
     this.hash = this.computeHash();     
    }
    computeHash(){
        return SHA256(this.index + this.precedingHash + this.timestamp + JSON.stringify(this.data)).toString();
    }   
}

As you can see in the code above, I created the CryptoBlock class and added the constructor() method to it — just like it’s done in any other JavaScript class. Then, to initialize its properties, I assigned the following parameters to the constructor method:

index It’s a unique number that tracks the position of every block in the entire blockchain.
timestamp It keeps a record of the time of occurrence of each completed transaction.
data It provides data about the completed transactions, such as the sender details, recipient’s details, and quantity transacted.
precedingHash It points to the hash of the preceding block in the blockchain, something important in maintaining the blockchain’s integrity.

Furthermore, I used the computeHash method to calculate the hash of the block based on its properties, as given in the data above.

As you can see, I imported the crypto-js JavaScript library and used its crypto-js/sha256 module to calculate the hash of each block. Since the module returns a number object, I used the toString() method to convert it into a string.

To add the crypto-js library to your project, go the terminal and run the following command to install it using npm:

npm install --save crypto-js

After running the above command, the node modules directory, which contains the library and other essential files, will be added to your project’s folder.

How To Create A Blockchain

As earlier explained, the blockchain technology is based on the concept that all the blocks are chained to one another. So, let’s create a CryptoBlockchain class that will be responsible for handling the operations of the entire chain. This is where the rubber is going to meet the road.

The CryptoBlockchain class will maintain the operations of the blockchain using helper methods that accomplish different tasks, such as creating new blocks and adding them to the chain.

Here is the code for the CryptoBlockchain class:

class CryptoBlockchain{
    constructor(){
        this.blockchain = [this.startGenesisBlock()];     
    }
    startGenesisBlock(){
        return new CryptoBlock(0, "01/01/2020", "Initial Block in the Chain", "0");
    }
    obtainLatestBlock(){
        return this.blockchain[this.blockchain.length - 1];
    }
    addNewBlock(newBlock){
        newBlock.precedingHash = this.obtainLatestBlock().hash;
        newBlock.hash = newBlock.computeHash();        
        this.blockchain.push(newBlock);
    }
}

Let me talk about the roles of each of the helper methods that constitute the CryptoBlockchain class.

1. Constructor Method

This method instantiates the blockchain. Inside the constructor, I created the blockchain property, which refers to an array of blocks. Notice that I passed to it the startGenesisBlock() method, which creates the initial block in the chain.

2. Creating The Genesis Block

In a blockchain, the genesis block refers to the first-ever block created on the network. Whenever a block is integrated with the rest of the chain, it should reference the preceding block.

Conversely, in the case of this initial block, it does not have any preceding block to point to. Therefore, a genesis block is usually hardcoded into the blockchain. This way, subsequent blocks can be created on it. It usually has an index of 0.

I used the startGenesisBlock() method to create the genesis block. Notice that I created it using the afore-created CryptoBlock class and passed the index, timestamp, data, and precedingHash parameters.

3. Obtaining The Latest Block

Getting the latest block in the blockchain assists in ensuring the hash of the current block points to the hash of the previous block — thus maintaining the chain’s integrity.

I used the obtainLatestBlock() method to retrieve it.

4. Adding New Blocks

I used the addNewBlock() method to add a new block to the chain. To accomplish this, I set the previous hash of the new block to be equal to the hash of the last block in the chain — thus ensuring the chain is tamper-proof.

Since the properties of the new block get changed with every new calculation, it’s important to calculate its cryptographic hash again. After updating its hash, the new block is pushed into the blockchain array.

In reality, adding a new block to a blockchain is not that easy because of the several checks that have been placed. Nonetheless, for this simple cryptocurrency, it’s enough to demonstrate how a blockchain actually works.

Testing The Blockchain

Now, let’s test our simple blockchain and see if it works.

Here is the code:

let smashingCoin = new CryptoBlockchain();
smashingCoin.addNewBlock(new CryptoBlock(1, "01/06/2020", {sender: "Iris Ljesnjanin", recipient: "Cosima Mielke", quantity: 50}));
smashingCoin.addNewBlock(new CryptoBlock(2, "01/07/2020", {sender: "Vitaly Friedman", recipient: "Ricardo Gimenes", quantity: 100}) );
console.log(JSON.stringify(smashingCoin, null, 4));

As you can see in the code above, I created a new instance of the CryptoBlockchain class and named it as smashingCoin. Then, I added two blocks into the blockchain using some arbitrary values. In the data parameter, I used an object and added sender details, recipient’s details, and quantity transacted.

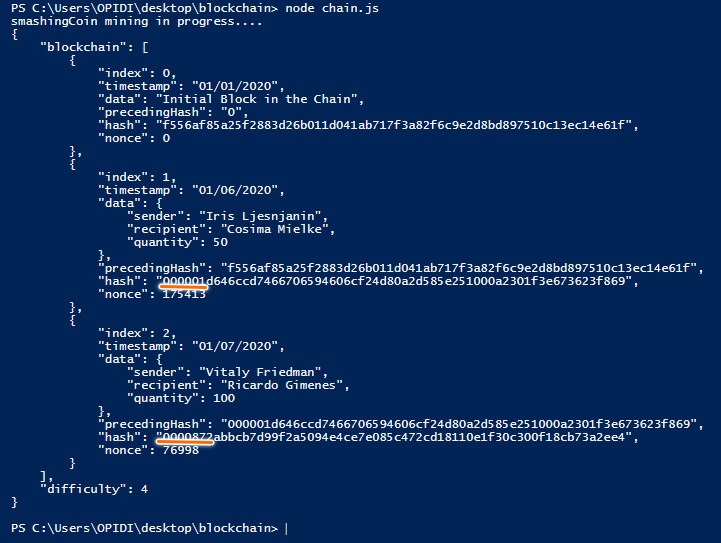
If I run the code on the terminal, here is the output I get:

How a blockchain looks like under the hood
Testing to see if our blockchain works. (Large preview)

That’s what the smashingCoin looks like! It’s an object that contains the blockchain property, which is an array containing all the blocks in the chain. As you can see in the image above, each block references the hash of the previous block. For example, the second block references the hash of the first block. After testing and seeing that our blockchain works, let’s add some more functionalities to enhance the features of the smashingCoin.

How To Verify The Blockchain’s Integrity

As earlier mentioned, a key characteristic of a blockchain is that once a block has been added to the chain, it cannot be changed without invalidating the integrity of the rest of the chain.

Therefore, to verify the integrity of the blockchain, I’ll add a checkChainValidity() method to the CryptoBlockchain class.

Hashes are critical for ensuring the validity and security of a blockchain because any change in the contents of a block will result in the production of an entirely new hash, and invalidating the blockchain.

As such, the checkChainValidity() method will make use of if statements to verify whether the hash of every block has been tampered with. Starting from the first created block, it’ll loop over the entire blockchain and check for its validity. Note that since the genesis block was hardcoded, it’ll not be checked.

Also, the method will verify whether the hashes of each two consecutive blocks are pointing to one another. If the integrity of the blockchain has not been compromised, it returns true; otherwise, in case of any anomalies, it returns false.

Here is the code:

checkChainValidity(){
        for(let i = 1; i 

How To Add Proof Of Work

As earlier mentioned, proof of work is the concept applied to increase the difficulty entailed in mining or adding new blocks to the blockchain.

In the case of smashingCoin, I’ll employ a simple algorithm that deters people from generating new blocks easily or spamming the blockchain.

So, in the CryptoBlock class, I’ll add another method called proofOfWork().Essentially, this simple algorithm identifies a number, passed as a difficulty property, such that the hash of every block contains leading zeros that correspond to this difficulty level.

Ensuring the hash of every block begins with the number of zeros as set in the difficulty level requires a lot of computing power. The higher the difficulty level, the more time it takes to mine new blocks.

Furthermore, I’ll add a random nonce value to every hashed block such that, when rehashing takes place, the difficulty level restrictions can still be met.

Here is the code:

proofOfWork(difficulty){
      while(this.hash.substring(0, difficulty) !==Array(difficulty + 1).join("0")){
          this.nonce++;
          this.hash = this.computeHash();
      }        
  }

And, here is the updated computeHash() method with the nonce variable included:

computeHash(){
        return SHA256(this.index + this.precedingHash + this.timestamp + JSON.stringify(this.data)+this.nonce).toString();
    }

Additionally, to implement the proof of work mechanism in the generation of new blocks, I’ll include it in the addNewBlock() method:

addNewBlock(newBlock){
      newBlock.precedingHash = this.obtainLatestBlock().hash;
      //newBlock.hash = newBlock.computeHash(); 
      newBlock.proofOfWork(this.difficulty);       
      this.blockchain.push(newBlock);
  }

Wrapping Up

Here is the entire code for building the smashingCoin cryptocurrency using Node.js:

const SHA256 = require("crypto-js/sha256");
class CryptoBlock {
  constructor(index, timestamp, data, precedingHash = " ") {
    this.index = index;
    this.timestamp = timestamp;
    this.data = data;
    this.precedingHash = precedingHash;
    this.hash = this.computeHash();
    this.nonce = 0;
  }

  computeHash() {
    return SHA256(
      this.index +
        this.precedingHash +
        this.timestamp +
        JSON.stringify(this.data) +
        this.nonce
    ).toString();
  }

  proofOfWork(difficulty) {
    while (
      this.hash.substring(0, difficulty) !== Array(difficulty + 1).join("0")
    ) {
      this.nonce++;
      this.hash = this.computeHash();
    }
  }
}

class CryptoBlockchain {
  constructor() {
    this.blockchain = [this.startGenesisBlock()];
    this.difficulty = 4;
  }
  startGenesisBlock() {
    return new CryptoBlock(0, "01/01/2020", "Initial Block in the Chain", "0");
  }

  obtainLatestBlock() {
    return this.blockchain[this.blockchain.length - 1];
  }
  addNewBlock(newBlock) {
    newBlock.precedingHash = this.obtainLatestBlock().hash;
    //newBlock.hash = newBlock.computeHash();
    newBlock.proofOfWork(this.difficulty);
    this.blockchain.push(newBlock);
  }

  checkChainValidity() {
    for (let i = 1; i 

If I run the code on the terminal, here is the output I get:

Output of creating a simple cryptocurrency in Node.js
At last, our smashingCoin cryptocurrency! (Large preview)

As you can see on the image above, the hashes now start with four zeros, which correspond with the difficulty level set in the proof of work mechanism.

Conclusion

That’s it! That’s how you can build a simple cryptocurrency blockchain using Node.js.

Of course, the smashingCoin cryptocurrency is far from complete. In fact, if you release it without making more improvements, it is unlikely to meet the current market demands for a secure, reliable, and intuitive digital currency — making you the only one using it!

Nonetheless, I hope that this tutorial has equipped you with some basic skills to get your feet wet in the thrilling world of cryptos.

If you have any comments or questions, please post them below.

Further Resources

Smashing Editorial
(dm, il)

from Tumblr https://ift.tt/37QxSWR