Friday, 29 May 2020

Smashing Meets Gives A Sneak Preview Of What To Expect At Live!

Smashing Meets Gives A Sneak Preview Of What To Expect At Live!

Rachel Andrew

Last week we had our first Smashing Meets event. A free event across two days and many timezones, with three speakers each day and plenty of chance for attendees to chat and ask questions of the speakers. In addition to brightening your day with a virtual meetup, Meets was a chance for us to test the conference platform we’ll be using for our first Smashing Live! conference. So, how did it go?

What Was Smashing Meets?

With Smashing Meets, we were attempting to bring some of the feel of a community meetup to an online format. We’ve all been missing meeting up, chatting, and hearing from speakers at local events. As Smashing readers live all over the world, we decided to do two events, one which was better suited to US timezones, and another more suited to Europe and Asia.

“What a delightful few hours over both days it was! I had a blast, and I think the experience as a speaker was great. Well done to all the team!”

— Mark Boulton

Across the two days, over 500 attendees heard talks from:

  • Yiying Lu
  • Phil Hawksworth
  • Mark Boulton
  • Mandy Michael
  • and me, Rachel Andrew!

As a speaker, I really enjoyed the format. Presenting online can seem a bit strange as you have none of the immediate audience feedback from the faces in front of you. However, after the talk, I moved to a session room to take questions. I was definitely able to answer far more individual questions than I normally can after an in-person talk. Attendees seemed to really enjoy getting to talk to speakers in this way too. One attendee told us in the feedback form:

“I am more likely to ask a question in a chat setting (nerves/shyness keep me from physically asking questions in a conference setting.) It was SO cool to have my question answered and be able to directly interact with the speaker!”
A screenshot of the screen during Smashing Meets
(Large preview)

In addition to the Q&A sessions with speakers, we tried other ways to encourage people to interact with other attendees from around the world. We encouraged them to meet our community partners, do challenges, and take part in a quiz. We were pleased to get feedback that some of our attendees picked up on the meetup atmosphere:

“It really felt like a community meetup: laidback, fun and just everyone wanting to have a good time, having the chat along with the talks was fun.”

What Did We Learn?

The attendees certainly seemed to take a lot away from our speakers, but we also learned a lot about running an online event.

We found that, in some ways, online is the same as offline; if we place the experience of our attendees first, we don’t go too far wrong. Good talks by smashing speakers are why people attend. Interactive Sessions are an added value.

Just as with offline events, some people prefer a single track and not missing anything, while others love the idea of picking their favorite things to do. It is possible to make online events social and interactive. It takes work, and a reimagining of how things work in this setting, however as I have found in workshops people are often more keen to chat online than off. The choice of platform is important here too, if the event isn’t to just be one presentation playing after another.

Ultimately, we found the only things people really missed are the snacks and lunches!

Up Next, Smashing Live!

We hope to do another Meets at some point, however, our next event is on a somewhat larger scale. We’ll be taking everything we learned from Meets and using it to make our Smashing Live conference even better. Join us for Smashing Live, a virtual conference with plenty of real-life fun and interaction with new friends from all over the world.

A woman sitting at two screens, one has lots of people on video
(Large preview)

We have managed to secure an amazing speaker line-up.

  • Josh Clarke on Machine Learning and UX
  • Sarah Drasner on JavaScript and Vue
  • Nadieh Bremer on Data Visualisation
  • Brad Frost and Dan Mall on Design Workflow
  • Chris Coyier on Front-end
  • Miriam Suzanne on CSS
  • Jared Spool on UX
  • Guillaume Rauch on Static Websites and Serverless

And, of course, a Mystery Speaker, and unlike a regular SmashingConf, where you might spot a likely candidate walking around the venue, it’s going to be pretty hard to work out who they are this time! If you think you know, we’ll be inviting you to guess, and maybe win a prize.

Timings And Practical Things

Smashing Live is on June 9th and 10th, 2020. 11am - 4pm in New York, making it 5pm-10pm in Amsterdam. You can find more timezones on the website.

We have thought a lot about what it means to attend a virtual conference. Feedback from Meets and our workshops tells us that shorter days make more sense than one long day. Many of you are also doing stellar work homeschooling children, taking care of family tasks, and trying to do your regular job all from home. Therefore Live will run for two half days, this also has the advantage of making the content accessible for more timezones. Recordings will be available after the event too, so no-one misses a thing.

A ticket for SmashingLive is USD $225, with a discount for Smashing Members (10% for Members, 25% for Smashers). If you are a member head over to your Member Dashboard for your discount links. For everyone else, book your ticket here.

Workshops

We’ll run online workshops before and after the conference, just as we do at our regular events. The aim is to give attendees the same experience and access to experts as with an in-person workshop, without needing to leave a desk. The workshops are taught live, and you’ll have plenty of chances to ask questions. You save USD $100 if you add a workshop to your conference ticket.

We have the following workshops planned:

June 11–12 The CSS Layout Masterclass Rachel Andrew
June 16–30 Front-End Accessibility Masterclass Marcy Sutton
June 18–26 Building Modern HTML Emails RĂ©mi Parmentier
July 2–17 Buy! The eCommerce UX Workshop Vitaly Friedman
July 7–21 Design Systems Brad Frost

Feedback from our previous workshops has been amazing, and many of them have sold out as we have limited capacity depending on how each expert likes to teach. So don’t delay if you see a favorite on the list.

The whole team thanks you for your support of our events and everything else we’ve been doing since we all ended up in lockdown. We’re happy we have managed to keep the community spirit going, and provide lots of chances to learn from our speakers and each other.

Find out all the details of Smashing Live and book tickets on the SmashingConf site.

Smashing Editorial
(jn, il)

from Tumblr https://ift.tt/3daLhg5
Mirage JS Deep Dive: Understanding Factories, Fixtures And Serializers (Part 2)

Mirage JS Deep Dive: Understanding Factories, Fixtures And Serializers (Part 2)

Kelvin Omereshone

In the previous article of this series, we understudied Models and Associations as they relate to Mirage. I explained that Models allow us to create dynamic mock data that Mirage would serve to our application when it makes a request to our mock endpoints. In this article, we will look at three other Mirage features that allow for even more rapid API mocking. Let’s dive right in!

Note: I highly recommend reading my first two articles if you haven’t to get a really solid handle on what would be discussed here. You could however still follow along and reference the previous articles when necessary.

Factories

In a previous article, I explained how Mirage JS is used to mock backend API, now let’s assume we are mocking a product resource in Mirage. To achieve this, we would create a route handler which will be responsible for intercepting requests to a particular endpoint, and in this case, the endpoint is api/products. The route handler we create will return all products. Below is the code to achieve this in Mirage:

import { Server, Model } from 'miragejs';

new Server({
    models: {
      product: Model,
    },

   routes() {
        this.namespace = "api";
        this.get('products', (schema, request) => {
        return schema.products.all()
    })
   }
});
    },

The output of the above would be:

{
  "products": []
}

We see from the output above that the product resource is empty. This is however expected as we haven’t created any records yet.

Pro Tip: Mirage provides shorthand needed for conventional API endpoints. So the route handler above could also be as short as: this.get('/products').

Let’s create records of the product model to be stored in Mirage database using the seeds method on our Server instance:

 seeds(server) {
      server.create('product', { name: 'Gemini Jacket' })
      server.create('product', { name: 'Hansel Jeans' })
  },

The output:

{
  "products": [
    {
      "name": "Gemini Jacket",
      "id": "1"
    },
    {
      "name": "Hansel Jeans",
      "id": "2"
    }
  ]
}

As you can see above, when our frontend application makes a request to /api/products, it will get back a collection of products as defined in the seeds method.

Using the seeds method to seed Mirage’s database is a step from having to manually create each entry as an object. However, it wouldn’t be practical to create 1000(or a million) new product records using the above pattern. Hence the need for factories.

Factories Explained

Factories are a faster way to create new database records. They allow us to quickly create multiple records of a particular model with variations to be stored in the Mirage JS database.

Factories are also objects that make it easy to generate realistic-looking data without having to seed those data individually. Factories are more of recipes or blueprints for creating records off models.

Creating A Factory

Let’s examine a Factory by creating one. The factory we would create will be used as a blueprint for creating new products in our Mirage JS database.

import { Factory } from 'miragejs'

new Server({
    // including the model definition for a better understanding of what’s going on
    models: {
        product: Model
    },
    factories: {
        product: Factory.extend({})
    }
})

From the above, you’d see we added a factories property to our Server instance and define another property inside it that by convention is of the same name as the model we want to create a factory for, in this case, that model is the product model. The above snippet depicts the pattern you would follow when creating factories in Mirage JS.

Although we have a factory for the product model, we really haven’t added properties to it. The properties of a factory can be simple types like strings, booleans or numbers, or functions that return dynamic data as we would see in the full implementation of our new product factory below:

import { Server, Model, Factory } from 'miragejs'

new Server({
    models: {
        product: Model
    },

   factories: {
      product: Factory.extend({
        name(i) {
          //  i is the index of the record which will be auto incremented by Mirage JS
          return `Awesome Product ${i}`; // Awesome Product 1, Awesome Product 2, etc.
        },
        price() {
          let minPrice = 20;
          let maxPrice = 2000;
          let randomPrice =
            Math.floor(Math.random() * (maxPrice - minPrice + 1)) + minPrice;
          return `$ ${randomPrice}`;
        },
        category() {
          let categories = [
            'Electronics',
            'Computing',
            'Fashion',
            'Gaming',
            'Baby Products',
          ];
          let randomCategoryIndex = Math.floor(
            Math.random() * categories.length
          );
          let randomCategory = categories[randomCategoryIndex];
          return randomCategory;
        },
         rating() {
          let minRating = 0
          let maxRating = 5
          return Math.floor(Math.random() * (maxRating - minRating + 1)) + minRating;
        },
      }),
    },
})

In the above code snippet, we are specifying some javascript logic via Math.random to create dynamic data each time the factory is used to create a new product record. This shows the strength and flexibility of Factories.

Let’s create a product utilizing the factory we defined above. To do that, we call server.create and pass in the model name (product) as a string. Mirage will then create a new record of a product using the product factory we defined. The code you need in order to do that is the following:

new Server({
    seeds(server) {
        server.create("product")
    }
})

Pro Tip: You can run console.log(server.db.dump()) to see the records in Mirage’s database.

A new record similar to the one below was created and stored in the Mirage database.

{
  "products": [
    {
      "rating": 3,
      "category": "Computing",
      "price": "$739",
      "name": "Awesome Product 0",
      "id": "1"
    }
  ]
}

Overriding factories

We can override some or more of the values provided by a factory by explicitly passing them in like so:

server.create("product", {name: "Yet Another Product", rating: 5, category: "Fashion" })

The resulting record would be similar to:

{
  "products": [
    {
      "rating": 5,
      "category": "Fashion",
      "price": "$782",
      "name": "Yet Another Product",
      "id": "1"
    }
  ]
}

createList

With a factory in place, we can use another method on the server object called createList. This method allows for the creation of multiple records of a particular model by passing in the model name and the number of records you want to be created. Below is it’s usage:

server.createList("product", 10)

Or

server.createList("product", 1000)

As you’ll observe, the createList method above takes two arguments: the model name as a string and a non-zero positive integer representing the number of records to create. So from the above, we just created 500 records of products! This pattern is useful for UI testing as you’ll see in a future article of this series.

Fixtures

In software testing, a test fixture or fixture is a state of a set or collection of objects that serve as a baseline for running tests. The main purpose of a fixture is to ensure that the test environment is well known in order to make results repeatable.

Mirage allows you to create fixtures and use them to seed your database with initial data.

Note: It is recommended you use factories 9 out of 10 times though as they make your mocks more maintainable.

Creating A Fixture

Let’s create a simple fixture to load data onto our database:

 fixtures: {
      products: [
        { id: 1, name: 'T-shirts' },
        { id: 2, name: 'Work Jeans' },
      ],
  },

The above data is automatically loaded into the database as Mirage’s initial data. However, if you have a seeds function defined, Mirage would ignore your fixture with the assumptions that you meant for it to be overridden and instead use factories to seed your data.

Fixtures In Conjunction With Factories

Mirage makes provision for you to use Fixtures alongside Factories. You can achieve this by calling server.loadFixtures(). For example:

 fixtures: {
    products: [
      { id: 1, name: "iPhone 7" },
      { id: 2, name: "Smart TV" },
      { id: 3, name: "Pressing Iron" },
    ],
  },

  seeds(server) {
    // Permits both fixtures and factories to live side by side
    server.loadFixtures()

    server.create("product")
  },

Fixture files

Ideally, you would want to create your fixtures in a separate file from server.js and import it. For example you can create a directory called fixtures and in it create products.js. In products.js add:

// <PROJECT-ROOT>/fixtures/products.js
export default [
  { id: 1, name: 'iPhone 7' },
  { id: 2, name: 'Smart TV' },
  { id: 3, name: 'Pressing Iron' },
];

Then in server.js import and use the products fixture like so:

import products from './fixtures/products';
 fixtures: {
    products,
 },

I am using ES6 property shorthand in order to assign the products array imported to the products property of the fixtures object.

It is worthy of mention that fixtures would be ignored by Mirage JS during tests except you explicitly tell it not to by using server.loadFixtures()

Factories vs. Fixtures

In my opinion, you should abstain from using fixtures except you have a particular use case where they are more suitable than factories. Fixtures tend to be more verbose while factories are quicker and involve fewer keystrokes.

Serializers

It’s important to return a JSON payload that is expected to the frontend hence serializers.

A serializer is an object that is responsible for transforming a **Model** or **Collection** that’s returned from your route handlers into a JSON payload that’s formatted the way your frontend app expects.

Mirage Docs

Let’s take this route handler for example:

this.get('products/:id', (schema, request) => {
        return schema.products.find(request.params.id);
      });

A Serializer is responsible for transforming the response to something like this:

{
  "product": {
    "rating": 0,
    "category": "Baby Products",
    "price": "$654",
    "name": "Awesome Product 1",
    "id": "2"
  }
}

Mirage JS Built-in Serializers

To work with Mirage JS serializers, you’d have to choose which built-in serializer to start with. This decision would be influenced by the type of JSON your backend would eventually send to your front-end application. Mirage comes included with the following serializers:

  • JSONAPISerializer
    This serializer follows the JSON:API spec.
  • ActiveModelSerializer
    This serializer is intended to mimic APIs that resemble Rails APIs built with the active_model_serializer gem.
  • RestSerializer
    The RestSerializer is Mirage JS “catch all” serializer for other common APIs.

Serializer Definition

To define a serialize, import the appropriate serializer e.g RestSerializer from miragejs like so:

import { Server, RestSerializer } from "miragejs"

Then in the Server instance:

new Server({
  serializers: {
    application: RestSerializer,
  },
})

The RestSerializer is used by Mirage JS by default. So it’s redundant to explicitly set it. The above snippet is for exemplary purposes.

Let’s see the output of both JSONAPISerializer and ActiveModelSerializer on the same route handler as we defined above

JSONAPISerializer

import { Server, JSONAPISerializer } from "miragejs"
new Server({
  serializers: {
    application: JSONAPISerializer,
  },
})

The output:

{
  "data": {
    "type": "products",
    "id": "2",
    "attributes": {
      "rating": 3,
      "category": "Electronics",
      "price": "$1711",
      "name": "Awesome Product 1"
    }
  }
}

ActiveModelSerializer

To see the ActiveModelSerializer at work, I would modify the declaration of category in the products factory to:

productCategory() {
          let categories = [
            'Electronics',
            'Computing',
            'Fashion',
            'Gaming',
            'Baby Products',
          ];
          let randomCategoryIndex = Math.floor(
            Math.random() * categories.length
          );
          let randomCategory = categories[randomCategoryIndex];
          return randomCategory;
        },

All I did was to change the name of the property to productCategory to show how the serializer would handle it.

Then, we define the ActiveModelSerializer serializer like so:

import { Server, ActiveModelSerializer } from "miragejs"
new Server({
  serializers: {
    application: ActiveModelSerializer,
  },
})

The serializer transforms the JSON returned as:

{
  "rating": 2,
  "product_category": "Computing",
  "price": "$64",
  "name": "Awesome Product 4",
  "id": "5"
}

You’ll notice that productCategory has been transformed to product_category which conforms to the active_model_serializer gem of the Ruby ecosystem.

Customizing Serializers

Mirage provides the ability to customize a serializer. Let’s say your application requires your attribute names to be camelcased, you can override RestSerializer to achieve that. We would be utilizing the lodash utility library:

import { RestSerializer } from 'miragejs';
import { camelCase, upperFirst } from 'lodash';
serializers: {
      application: RestSerializer.extend({
        keyForAttribute(attr) {
          return upperFirst(camelCase(attr));
        },
      }),
    },

This should produce JSON of the form:

 {
      "Rating": 5,
      "ProductCategory": "Fashion",
      "Price": "$1386",
      "Name": "Awesome Product 4",
      "Id": "5"
    }

Wrapping Up

You made it! Hopefully, you’ve got a deeper understanding of Mirage via this article and you’ve also seen how utilizing factories, fixtures, and serializers would enable you to create more production-like API mocks with Mirage. Look out for the next part of this series.

Smashing Editorial
(ra, il)

from Tumblr https://ift.tt/2yKSdBJ

How To Run The Right Kind Of Research Study With The Double-Diamond Model

How To Run The Right Kind Of Research Study With The Double-Diamond Model

Steve Bromley

Product and design teams make a lot of decisions. Early on in the development of a product, they will be thinking about features — such as what the product should do, and how each feature should work. Later on, those decisions become more nuanced — such as ‘what should this button say? Each decision introduces an element of risk — if a bad decision is made, it will reduce the chance for the product to be successful.

The people making these decisions rely on a variety of information sources to improve the quality of their decision This includes intuition, an understanding of the market, as well as an understanding of user behavior. Of these, the most valuable source of information to put evidence behind decisions is understanding our users.

Being armed with an understanding of the appropriate user research methods can be very valuable when developing new products. This article will cover some appropriate methods and advice on when to deploy them.

A Process For Developing Successful Products

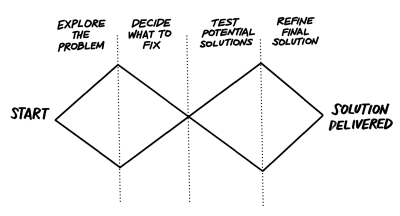
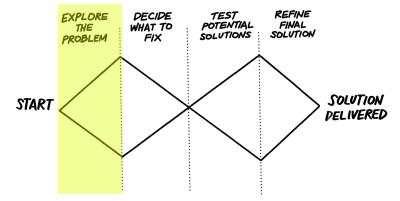
The double diamond is a model created by the UK’s Design Council which describes a process for making successful products. It describes taking time to understand a domain, picking the right problem to solve, and then exploring potential ideas in that space. This should prove that the product is solving real problems for users and that the implementation of the product works for users.

Diagram showing the design council’s Double Diamond model
The design council’s Double Diamond model (Large preview)

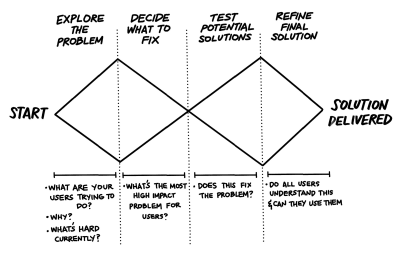
To succeed at each stage of the process requires understanding some information about your users. Some of the information we might want to understand from users when going through the process is as follows:

The double diamond image with user research questions linked to each phase
Some research questions appropriate for each stage (Large preview)

Each stage has some user research methods that are best suited to uncovering that information. In this article, we’ll refer to the double diamond to highlight the appropriate research method throughout product development.

Diamond 1: Exploring The Problem And Deciding What To Fix

The first diamond describes how to come up with a suitable problem that a new product or feature should fix. It requires understanding what problems users have, and prioritizing them to focus on a high-value area. This avoids the risk of building something that no-one is going to use.

The most effective way of understanding the problem is to get true first-hand experience of users performing real tasks in context. This is best done by applying ethnographic and observational methods to identify the range of problems that exist, then prioritizing them using methods such as surveys.

Double Diamond Phase Appropriate Method Why?
Explore the problem Ethnographic and Observational studies Gives deep insight into what problems people have that can inspire product decisions
Decide what to fix Surveys Discovers how representative problems are, and helps prioritise them

We’ll review each method, in turn, to describe why it’s appropriate.

Explore The Problem With Ethnographic And Observational Methods

The first phase of the double diamond is to ‘explore the problem’. User research can build up an understanding of how people act in the real world and the problems they face. This allows the problem space to be fully explored.

The double diamond image with ‘Explore the problem’ highlighted
Explore the problem (Large preview)

This valuable behavioral information is only uncovered only by watching people do real tasks and asking them questions to uncover their motivations and issues. Doing early qualitative research will help identify the problems that people have. These problems can inspire product ideas, features, and help teams understand how to successfully solve user’s problems. This information will also help disregard poor product ideas by revealing that there is no real need for it. This leads to a more useful product being developed and increasing the chance of success.

The most appropriate methods for doing this are ethnographic. This can include diary studies, where a user’s interaction with the subject matter is captured over a number of weeks. This reveals issues that wouldn’t turn up in a single session or that people wouldn’t remember to talk about in a lab-based interview.

This isn’t the only way of uncovering this kind of in-depth information though. Other suitable observational methods include watching people use existing software or products, both in the lab or in the wild. These are quicker and easier to run than diary studies, but are limited to only capturing a single interaction or what the participant will remember when prompted. For some subject matters, this might be enough (e.g. navigating an online shop can be done and explored in a single session). More complex interactions over time, such as behavior with fitness trackers, would be more sensible to track as a diary study.

Decide What To Fix With Surveys

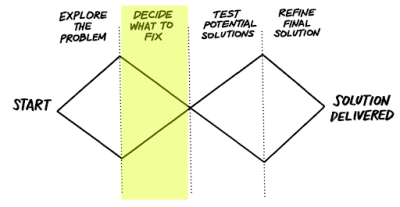
The second half of the first diamond comes next. Having understood real user’s contexts and what problems they have, these can then be documented and prioritized to ‘decide what to fix’.

The double diamond image with ‘Decide what to fix’ highlighted
Decide what to fix (Large preview)

This prioritization will be done by product managers who take into account many factors, such as “what do we have the technical ability to do” and “what meets our business goals”. However, user research can also add valuable information by uncovering the size of the issues users have. Surveys are a sensible approach for this, informed by the true understanding of user behavior uncovered in the earlier studies. This allows teams to size the uncovered issues and reveal how representative the behaviors discovered are.

Combining quantitative methods with generative user research studies help inspire early decisions about what a product should do. For example, Spotify’s discovery work on how people consume music analyzed primary research fieldwork to create personas and inform their development work. This allows a team to complete the first diamond with a clear understanding of what problem their product is trying to solve.

Diamond 2: Test And Refine Potential Solutions

The second diamond describes how to end up on a successful implementation of a product to fix the problem. Having decided which problem to fix, research can then explore different ways of fixing that problem, and help refine the best method.

Double Diamond Phase Appropriate Method Why?
Test potential solutions Moderated usability testing Creates a deep understanding of why the solution works, to inform iteration
Refine final solution Unmoderated usability testing Can get quick results on small questions, such as with the UI

Test Potential Solutions With Moderated Usability Testing

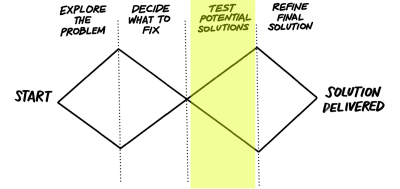
The second diamond in the double diamond design process starts with evaluating a variety of solutions in order to decide the best possible implementation of a product. To achieve this with rigor requires usability testing — creating representative prototypes and then observing if users can successfully complete tasks using them.

The double diamond image with ‘Test Potential Solutions’ highlighted
Test potential solutions (Large preview)

This kind of study takes time to do properly, and attention on each individual’s user experience to understand what causes the behavior that is observed during usability testing. A moderated session, with the researcher present, can ask probing questions to uncover things that participants won’t articulate unprompted such as “what are you thinking currently” or “ why did you decide to do that?”. These kinds of studies reveal more data when a moderator is able to ask participants these questions, and avoids missing the opportunity to gather more data from each study, which can be used to evaluate and iterate the product. A single moderated research session potentially reveals more useful information than a series of unmoderated tests.

This kind of in-depth exploration of the problem has been a key part of AirBNB’s early success. In 2009 the company was close to bankruptcy and desperate to understand why people were not booking rooms. By spending time with users reviewing the ads on their website, they were able to uncover that the pictures were the problem. This then allowed them to focus their iteration on the process for gathering photos of rooms, which put them on the path for changing hotel booking forever. As the global pandemic changes people’s behavior with holidays in the future, in-depth qualitative research will be essential as they continue to adapt to new challenges.

This doesn’t mean that the moderator has to be in the same room as the participant. Often it can be very valuable to find participants who are geographically remote, and avoid over-sampling people who live in major cities, which is often where research teams are based. Screen sharing software, such as google hangouts or zoom can make remote sessions possible, while still having the session run live with a moderator.

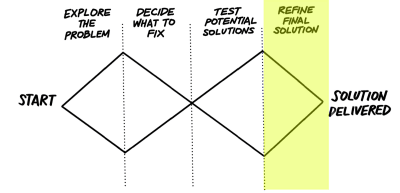
Refine Final Solution With Unmoderated Usability Testing

The final stage of the double diamond describes refining the final solution, which can require a lot of small iterative tests. A shortcut to the deep insight from moderated testing is remote unmoderated research. This includes tools like usertesting.com which allow teams to put their software in front of users with little effort. By sending a website URL to their panel of users, they send back videos of their participants using the website and commenting on their experience.

The double diamond image with ‘Refine final solution’ highlighted
Refine final solution (Large preview)

This method can be popular because it is quick (multiple sessions can run simultaneously without a moderator present) and cheap (participants aren’t paid a huge amount to take part). Because of this, it is often considered an appropriate tool by companies looking to start doing user research, however, care needs to be taken.

This method has constraints which means that it’s only sensible for later on in the design process. Because the participants on these kinds of websites are all people who test multiple websites regularly, they become increasingly different to a normal user. This changes their behavior while using websites and makes it dangerous to draw conclusions from their behavior about what other users would understand or do. This is called a sampling bias — creating a difference between ‘real’ users, and the users being tested.

Because of these risks, these studies may be most appropriate late in development, testing content or UI changes, when the risks of getting decisions wrong are much lower. Iterative studies ensure that users understand what has been created, and are able to use it in the way the designer intended. An example of this is the iterative usability testing the UK’s Government Digital Service ran to ensure citizens could successfully identify themselves and access government services.

After The Double Diamond

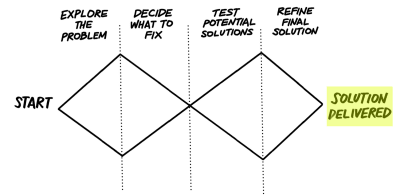
As we’ve covered, it is important to select the right method to de-risk product decisions before launch. When a product is launched, it will be immediately obvious whether there is an audience for it, and whether people understand and can use the product — both through how well the product sells, and through reviews and customer feedback.

The double diamond image with ‘Solution delivered’ highlighted
After the double diamond (Large preview)

Nevertheless, launching the right product doesn’t mean that the opportunity for research is over. New opportunities to explore real user behavior will continue to inspire adding or removing features, or changes to how the product works.

Double Diamond Phase Appropriate Method Why?
Solution delivered Analytics + moderated usability testing combined Inform future updates post-launch with qualitative and quantitative insight.

Combining some of the methods we’ve described previously with new data from analytics will continue to drive high-quality decision making.

Research After The Solution Is Delivered With Analytics

Post-launch analytics are an important part of building a complete understanding of the behavior of users.

Analytics will reveal what people are doing on a website. However, this information is most valuable when combined with understanding why that behavior is occurring. It is also important to be aware that analytics are only seeing a short section of a user’s experience, the part that happens on your website and their whole end-to-end journey also includes a lot of things that happened off the site, or in the real world. Building a research strategy that combines insight from analytics with an understanding of motivations from qualitative studies is a powerful combination to inform decision making.

This requires close collaboration between the analytics team and the user research team — regular community events, skills sharing and project updates will create awareness of the priorities of each team, the type of research questions they can support one another with and identify opportunities to work together, leading to a stronger combined team.

Optimize Your Research Process

In this article, we’ve covered some appropriate methods to use to inform product development. However, there can still be resistance to running the right kind of study.

New research teams may be asked to cut corners. This can include suggesting participants who are convenient, such as friends, without taking the time to screen them to ensure they represent real users. This can be suggested by colleagues who are unaware of the risks caused by taking decisions based on unrepresentative research.

In addition to running research studies, a researcher has to be an educator and advocate for running the right kind of studies and help their colleagues understand the differences in quality between the type of information gathered from different research methods. Presentations, roadshows, and creating posters are some techniques that can help achieve this.

Incorporating user research into decision making can be quite radical at some organizations, particularly those with a history of deferring to client wishes or listening to the highest-paid person in the room. A lot of hard work and creativity are needed to bring about change in how people work. This requires understanding the decision maker’s current incentives, and describing the benefits of research in a way that shows how it makes their life easier.

If an organization understands and accepts why running studies using appropriate methods it shows a real desire for improving the quality of decision making within the organization. This is an encouraging sign that a new research team has the potential to be successful.

The next step for new researchers will be to establish the logistics of running research, including creating a research process, building out the tools and software needed, and identifying the highest priority research questions for your organization. There is a lot of great guidance from the research community on techniques to do this, for example, the work being done by the research ops community.

Smashing Editorial
(ah, ra, il)

from Tumblr https://ift.tt/2XL9DXr

Thursday, 28 May 2020

How To Create Better Angular Templates With Pug

How To Create Better Angular Templates With Pug

Zara Cooper

As a developer, I appreciate how Angular apps are structured and the many options the Angular CLI makes available to configure them. Components provide an amazing means to structure views, facilitate code reusability, interpolation, data binding, and other business logic for views.

Angular CLI supports multiple built-in CSS preprocessor options for component styling like Sass/SCSS, LESS, and Stylus. However, when it comes to templates, only two options are available: HTML and SVG. This is in spite of many more efficient options such as Pug, Slim, HAML among others being in existence.

In this article, I’ll cover how you — as an Angular developer — can use Pug to write better templates more efficiently. You’ll learn how to install Pug in your Angular apps and transition existing apps that use HTML to use Pug.

Managing Image Breakpoints

A built-in Angular feature called BreakPoint Observer gives us a powerful interface for dealing with responsive images. Read more about a service that allows us to serve, transform and manage images in the cloud. Learn more →

Pug (formerly known as Jade) is a template engine. This means it’s a tool that generates documents from templates that integrate some specified data. In this case, Pug is used to write templates that are compiled into functions that take in data and render HTML documents.

In addition to providing a more streamlined way to write templates, it offers a number of valuable features that go beyond just template writing like mixins that facilitate code reusability, enable embedding of JavaScript code, provide iterators, conditionals, and so on.

Although HTML is universally used by many and works adequately in templates, it is not DRY and can get pretty difficult to read, write, and maintain especially with larger component templates. That’s where Pug comes in. With Pug, your templates become simpler to write and read and you can extend the functionality of your template as an added bonus. In the rest of this article, I’ll walk you through how to use Pug in your Angular component templates.

Why You Should Use Pug

HTML is fundamentally repetitive. For most elements you have to have an opening and closing tag which is not DRY. Not only do you have to write more with HTML, but you also have to read more. With Pug, there are no opening and closing angle brackets and no closing tags. You are therefore writing and reading a lot less code.

For example, here’s an HTML table:

<table>
   <thead>
       <tr>
           <th>Country</th>
           <th>Capital</th>
           <th>Population</th>
           <th>Currency</th>
       </tr>
   </thead>
   <tbody>
       <tr>
           <td>Canada</td>
           <td>Ottawa</td>
           <td>37.59 million</td>
           <td>Canadian Dollar</td>
       </tr>
       <tr>
           <td>South Africa</td>
           <td>Cape Town, Pretoria, Bloemfontein</td>
           <td>57.78 million</td>
           <td>South African Rand</td>
       </tr>
       <tr>
           <td>United Kingdom</td>
           <td>London</td>
           <td>66.65 million</td>
           <td>Pound Sterling</td>
       </tr>
   </tbody>
</table>

This is how that same table looks like in Pug:

table
 thead
   tr
     th Country
     th Capital(s)
     th Population
     th Currency
 tbody
   tr
     td Canada
     td Ottawa
     td 37.59 million
     td Canadian Dollar
   tr
     td South Africa
     td Cape Town, Pretoria, Bloemfontein
     td 57.78 million
     td South African Rand
   tr
     td United Kingdom
     td London
     td 66.65 million
     td Pound Sterling

Comparing the two versions of the table, Pug looks a lot cleaner than HTML and has better code readability. Although negligible in this small example, you write seven fewer lines in the Pug table than in the HTML table. As you create more templates over time for a project, you end up cumulatively writing less code with Pug.

Beyond the functionality provided by the Angular template language, Pug extends what you can achieve in your templates. With features (such as mixins, text and attribute interpolation, conditionals, iterators, and so on), you can use Pug to solve problems more simply in contrast to writing whole separate components or import dependencies and set up directives to fulfill a requirement.

Some Features Of Pug

Pug offers a wide range of features but what features you can use depends on how you integrate Pug into your project. Here are a few features you might find useful.

  1. Adding external Pug files to a template using include.

    Let’s say, for example, that you’d like to have a more succinct template but do not feel the need to create additional components. You can take out sections from a template and put them in partial templates then include them back into the original template.

    For example, in this home page component, the ‘About’ and ‘Services’ section are in external files and are included in the home page component.
    //- home.component.pug
    h1 Leone and Sons
    h2 Photography Studio
    
    include partials/about.partial.pug
    include partials/services.partial.pug
    //- about.partial.pug
    h2 About our business
    p Lorem ipsum dolor sit amet, consectetur adipiscing elit, sed do eiusmod tempor incididunt ut labore et dolore magna aliqua. Ut enim ad minim veniam, quis nostrud exercitation ullamco laboris nisi ut aliquip ex ea commodo consequat.
    //- services.partial.pug
    h2 Services we offer
    P Our services include: 
    ul  
        li Headshots
        li Corporate Event Photography
    HTML render of included partial templates example
    HTML render of included partial templates example (Large preview)
  2. Reusing code blocks using mixins.

    For example, let’s say you wanted to reuse a code block to create some buttons. You’d reuse that block of code using a mixin.
    mixin menu-button(text, action)
        button.btn.btn-sm.m-1(‘(click)’=action)&attributes(attributes)= text
    
    +menu-button('Save', 'saveItem()')(class="btn-outline-success")
    +menu-button('Update', 'updateItem()')(class="btn-outline-primary")
    +menu-button('Delete', 'deleteItem()')(class="btn-outline-danger")
    
    HTML render of menu buttons mixin example
    HTML render of menu buttons mixin example (Large preview)
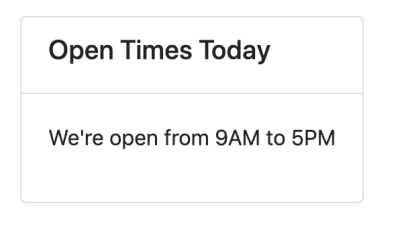
  3. Conditionals make it easy to display code blocks and comments based on whether a condition is met or not.
    - var day = (new Date()).getDay()
    
    if day == 0
       p We’re closed on Sundays
    else if  day == 6
       p We’re open from 9AM to 1PM
    else
       p We’re open from 9AM to 5PM
    HTML render of conditionals example
    HTML render of conditionals example (Large preview)
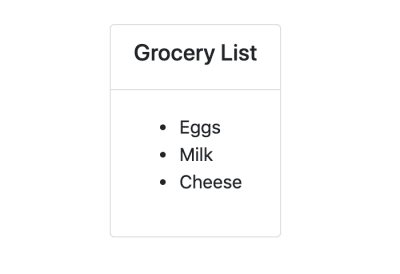
  4. Iterators such as each and while provide iteration functionality.
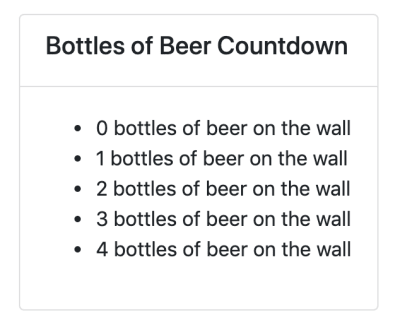
    ul
     each item in ['Eggs', 'Milk', 'Cheese']
       li= item
    
    ul
     while n 
    HTML renders of iterators example
    (Large preview)
    HTML renders of iterators example
    HTML renders of iterators example (Large preview)
  5. Inline JavaScript can be written in Pug templates as demonstrated in the examples above.
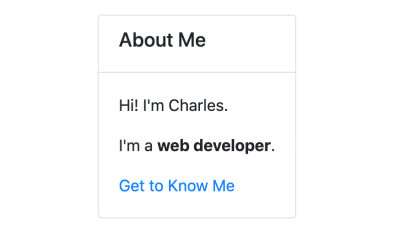
  6. Interpolation is possible and extends to tags and attributes.
    - var name = 'Charles'
    p Hi! I’m #{name}.
    
    p I’m a #[strong web developer].
    
    a(href='https://about.me/${name}') Get to Know Me
    HTML render of interpolation example
    HTML render of interpolation example (Large preview)
  7. Filters enable the use of other languages in Pug templates.

    For example, you can use Markdown in your Pug templates after installing a JSTransformer Markdown module.
    :markdown-it
       # Charles the Web Developer
       ![Image of Charles](https://charles.com/profile.png)
    
       ## About
       Charles has been a web developer for 20 years at **Charles and Co Consulting.**
    
    HTML render of filter example
    HTML render of filter example (Large preview)

These are just a few features offered by Pug. You can find a more expansive list of features in Pug’s documentation.

How To Use Pug In An Angular App

For both new and pre-existing apps using Angular CLI 6 and above, you will need to install ng-cli-pug-loader. It’s an Angular CLI loader for Pug templates.

For New Components And Projects

  1. Install ng-cli-pug-loader.
    ng add ng-cli-pug-loader
  2. Generate your component according to your preferences.

    For example, let’s say we’re generating a home page component:
    ng g c home --style css -m app
  3. Change the HTML file extension, .html to a Pug extension, .pug. Since the initial generated file contains HTML, you may choose to delete its contents and start anew with Pug instead. However, HTML can still function in Pug templates so you can leave it as is.
  4. Change the extension of the template to .pug in the component decorator.
    @Component({
       selector: 'app-component',
       templateUrl: './home.component.pug',
       styles: ['./home.component.css']
    })

For Existing Components And Projects

  1. Install ng-cli-pug-loader.
    ng add ng-cli-pug-loader
  2. Install the html2pug CLI tool. This tool will help you convert your HTML templates to Pug.
    npm install -g html2pug
  3. To convert a HTML file to Pug, run:
    html2pug -f -c  [Pug file path]
    Since we’re working with HTML templates and not complete HTML files, we need to pass the -f to indicate to html2pug that it should not wrap the templates it generates in html and body tags. The -c flag lets html2pug know that attributes of elements should be separated with commas during conversion. I will cover why this is important below.
  4. Change the extension of the template to .pug in the component decorator as described in the For New Components and Projects section.
  5. Run the server to check that there are no problems with how the Pug template is rendered.

    If there are problems, use the HTML template as a reference to figure out what could have caused the problem. This could sometimes be an indenting issue or an unquoted attribute, although rare. Once you are satisfied with how the Pug template is rendered, delete the HTML file.

Things To Consider When Migrating From HTML To Pug Templates

You won’t be able to use inline Pug templates with ng-cli-pug-loader. This only renders Pug files and does not render inline templates defined in component decorators. So all existing templates need to be external files. If you have any inline HTML templates, create external HTML files for them and convert them to Pug using html2pug.

Once converted, you may need to fix templates that use binding and attribute directives. ng-cli-pug-loader requires that bound attribute names in Angular be enclosed in single or double quotes or separated by commas. The easiest way to go about this would be to use the -c flag with html2pug. However, this only fixes the issues with elements that have multiple attributes. For elements with single attributes just use quotes.

A lot of the setup described here can be automated using a task runner or a script or a custom Angular schematic for large scale conversions if you choose to create one. If you have a few templates and would like to do an incremental conversion, it would be better to just convert one file at a time.

Angular Template Language Syntax In Pug Templates

For the most part, Angular template language syntax remains unchanged in a Pug template, however, when it comes to binding and some directives (as described above), you need to use quotes and commas since (), [], and [()] interfere with the compilation of Pug templates. Here are a few examples:

//- [src], an attribute binding and [style.border], a style binding are separated using a comma. Use this approach when you have multiple attributes for the element, where one or more is using binding.
img([src]='itemImageUrl', [style.border]='imageBorder')

//- (click), an event binding needs to be enclosed in either single or double quotes. Use this approach for elements with just one attribute.
button('(click)'='onSave($event)') Save

Attribute directives like ngClass, ngStyle, and ngModel must be put in quotes. Structural directives like *ngIf, *ngFor, *ngSwitchCase, and *ngSwitchDefault also need to be put in quotes or used with commas. Template reference variables ( e.g. #var ) do not interfere with Pug template compilation and hence do not need quotes or commas. Template expressions surrounded in remain unaffected.

Drawbacks And Trade-offs Of Using Pug In Angular Templates

Even though Pug is convenient and improves workflows, there are some drawbacks to using it and some trade-offs that need to be considered when using ng-cli-pug-loader.

Files cannot be included in templates using include unless they end in .partial.pug or .include.pug or are called mixins.pug. In addition to this, template inheritance does not work with ng-cli-pug-loader and as a result, using blocks, prepending, and appending Pug code is not possible despite this being a useful Pug feature.

Pug files have to be created manually as Angular CLI only generates components with HTML templates. You will need to delete the generated HTML file and create a Pug file or just change the HTML file extension, then change the templateUrl in the component decorator. Although this can be automated using a script, a schematic, or a Task Runner, you have to implement the solution.

In larger pre-existing Angular projects, switching from HTML templates to Pug ones involves a lot of work and complexity in some cases. Making the switch will lead to a lot of breaking code that needs to be fixed file by file or automatically using a custom tool. Bindings and some Angular directives in elements need to be quoted or separated with commas.

Developers unfamiliar with Pug have to learn the syntax first before incorporating it into a project. Pug is not just HTML without angle brackets and closing tags and involves a learning curve.

When writing Pug and using its features in Angular templates ng-cli-pug-loader does not give Pug templates access to the component’s properties. As a result, these properties cannot be used as variables, in conditionals, in iterators, and in inline code. Angular directives and template expressions also do not have access to Pug variables. For example, with Pug variables:

//- app.component.pug
- var shoppingList = ['Eggs', 'Milk', 'Flour']

//- will work
ul
   each item in shoppingList
       li= item

//- will not work because shoppingList is a Pug variable
ul
   li(*ngFor="let item of shoppingList") 

Here’s an example with a property of a component:

//- src/app/app.component.ts
export class AppComponent{
   shoppingList = ['Eggs', 'Milk', 'Flour'];
}
//- app.component.pug 

//- will not work because shoppingList is a component property and not a Pug variable
ul
   each item in shoppingList
       li= item

//- will work because shoppingList is a property of the component
ul
   li(*ngFor="let item of shoppingList") 

Lastly, index.html cannot be a Pug template. ng-cli-pug-loader does not support this.

Conclusion

Pug can be an amazing resource to use in Angular apps but it does require some investment to learn and integrate into a new or pre-existing project. If you’re up for the challenge, you can take a look at Pug’s documentation to learn more about its syntax and add it to your projects. Although ng-cli-pug-loader is a great tool, it can be lacking in some areas. To tailor how Pug will work in your project consider creating an Angular schematic that will meet your project’s requirements.

Smashing Editorial
(ra, yk, il)

from Tumblr https://ift.tt/2Xa18pC